
- Wed 08 July 2026
- machine-learning
- #ci-cd, #github-actions, #huggingface, #docker, #deployment, #machine-learning, #mlops, #xournalpp-htr, #tutorial
🔗 Example workflow file in my repo & 🤗 Live demo on Hugging Face & 💬 Send me feedback
This is the written version of a video I made. If you prefer watching, the video is embedded below; if you prefer reading, everything is here as well.
Your model works on your computer - now what?
You’ve built a machine learning model. You’ve done all the training, all the data curation, and you have it running on localhost. It works.
But the moment your colleague or friend asks for a link to try it out, the whole system collapses. There is no link. There is only your laptop.
In this article I want to show you how to create a demo using Hugging Face Spaces in an automated way, so that you don’t have to deploy the model over and over again by hand. We’ll do that using CI/CD.
For the past 4+ years I’ve been working on an open source machine learning project, Xournal++ HTR, which brings handwritten text recognition to the open source note-taking app Xournal++. I want to share the learnings from that here, to make open source machine learning a little more accessible for everyone.
A short word on CI/CD
CI/CD stands for continuous integration and continuous deployment (or delivery). It is really, simply, an automation - an automation that triggers a task given an event.
The event could be, for example, whenever someone pushes code into a code base on Git or GitHub, or whenever a merge request or pull request is integrated. The task that is triggered could be linting the code to keep code quality high, or building the newest documentation.
Here, we want to use it to deploy a new version of your machine learning model into an app, so that people can actually use it.
The architecture
Let’s start with the architecture first, because I find it much easier to look at the code once you have the big picture in your head.
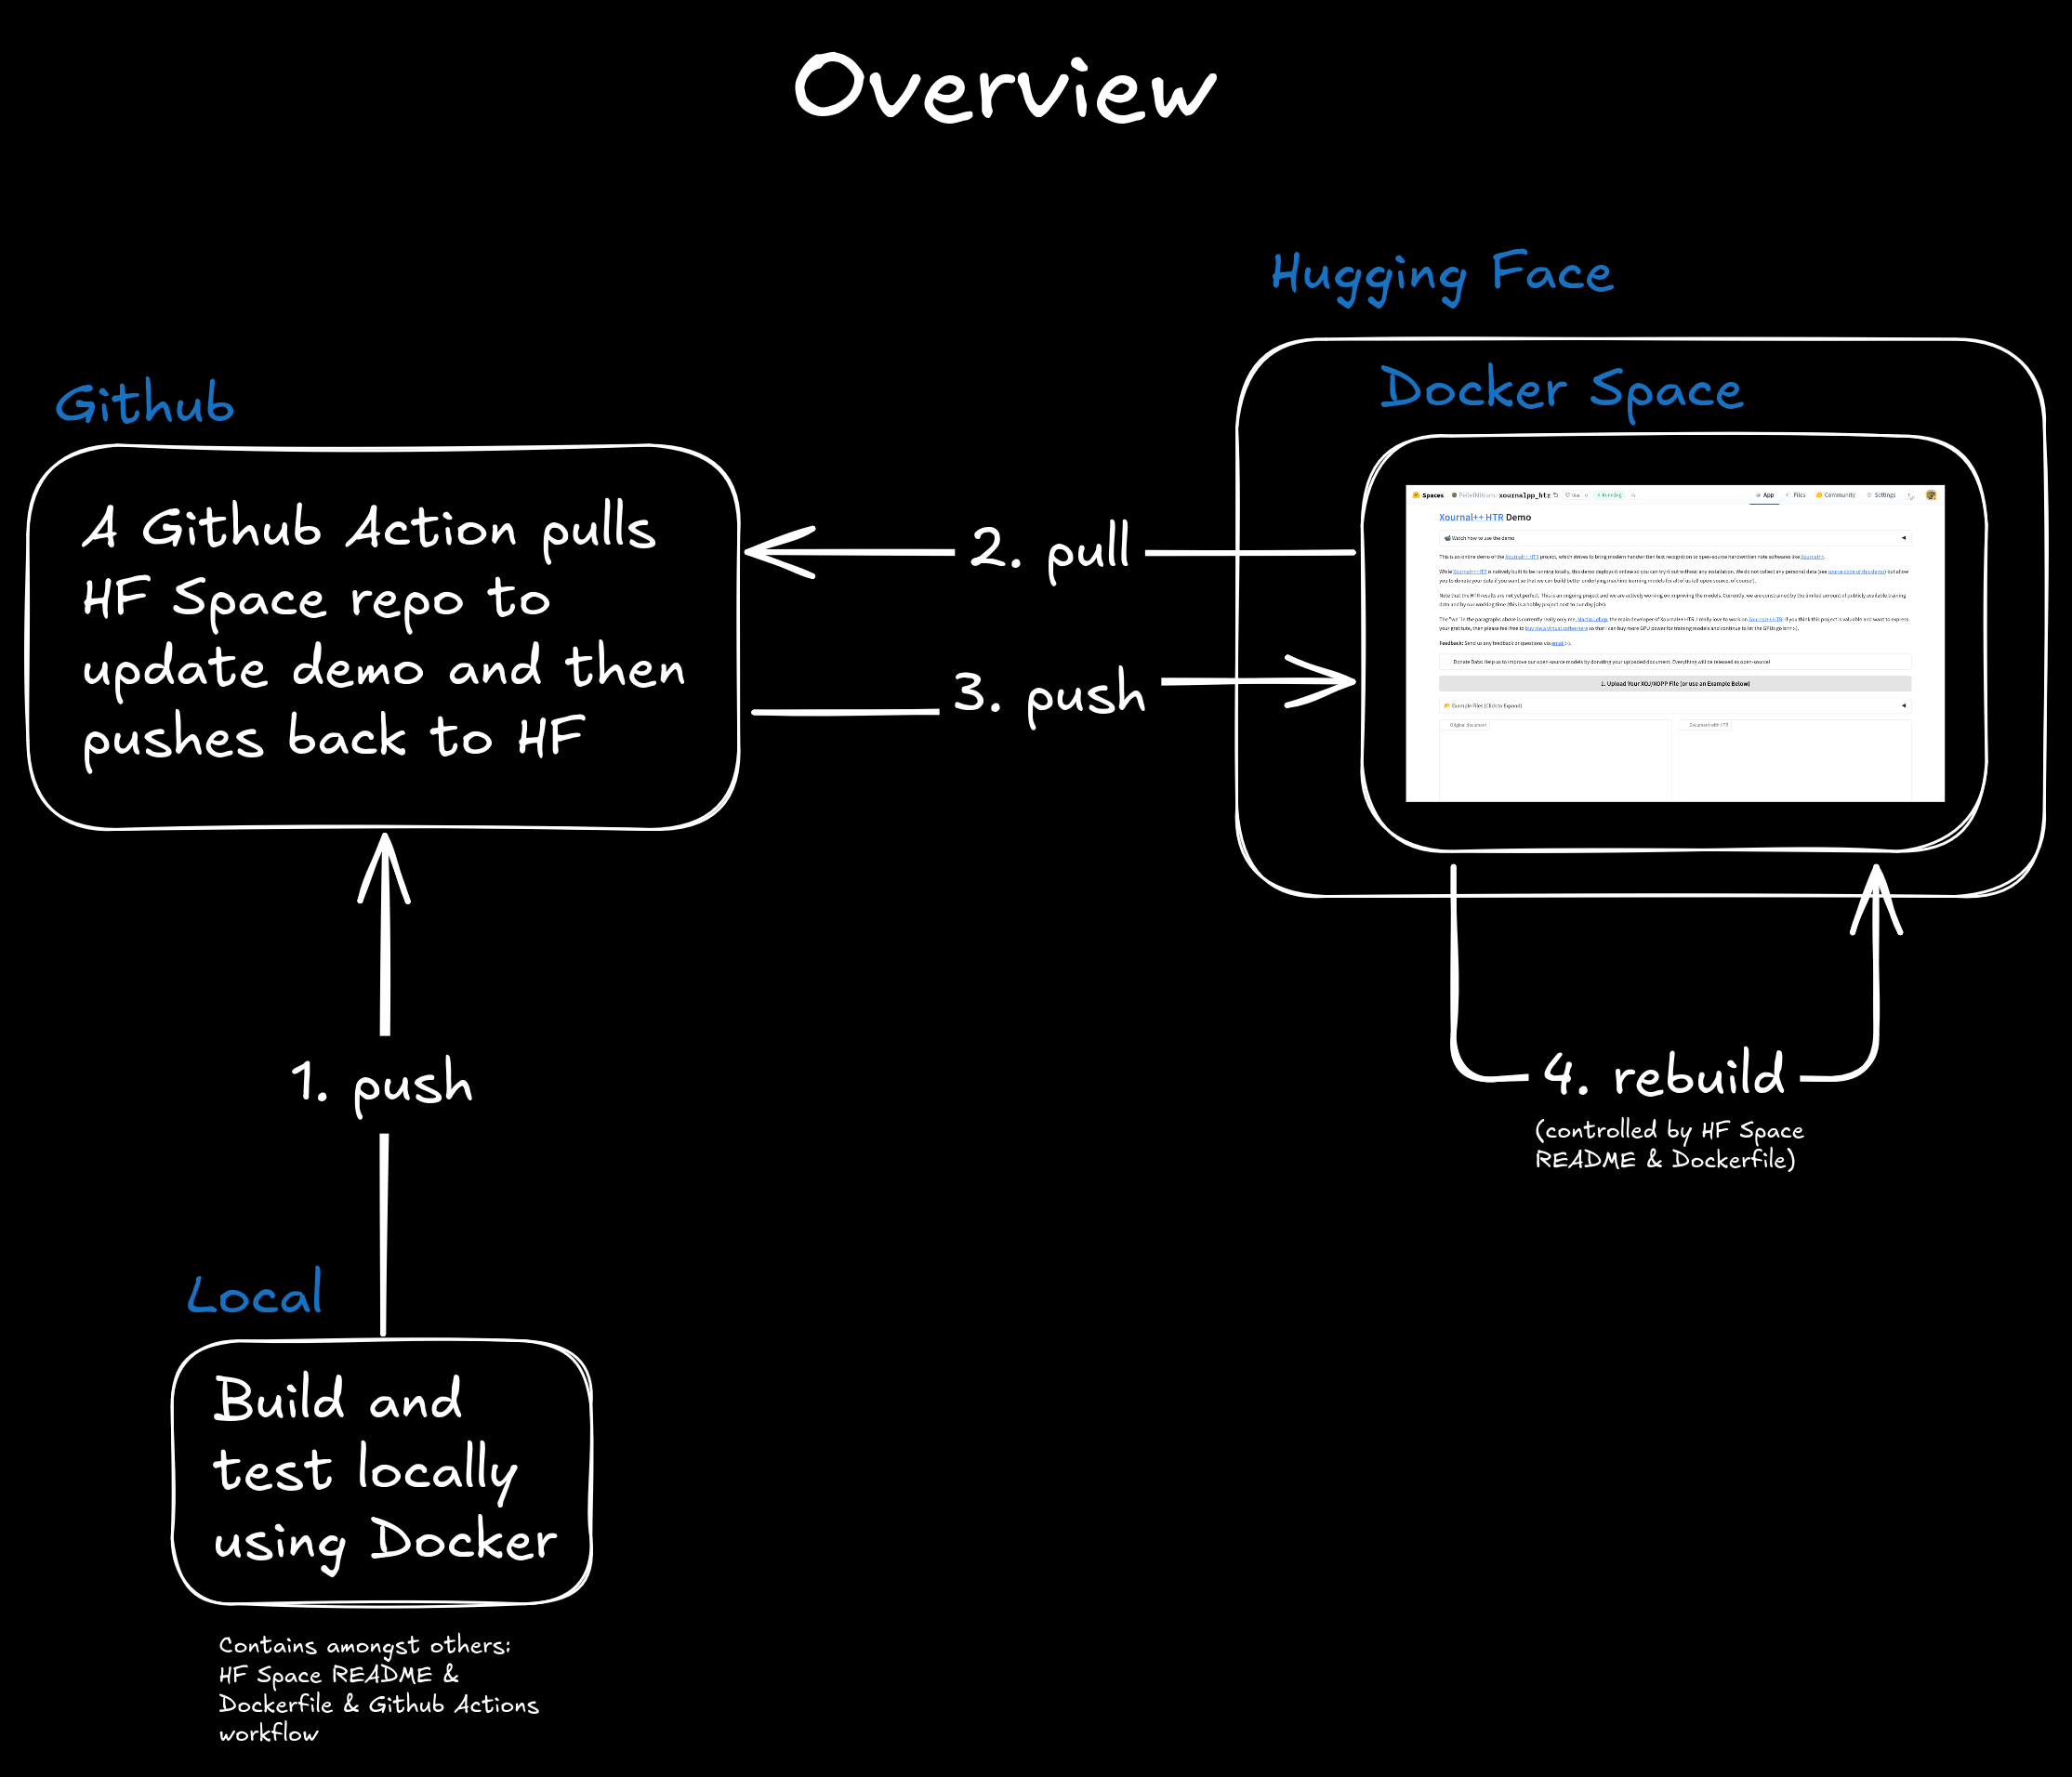
Overview of the automated deployment. You push locally to GitHub, a GitHub Action pushes to Hugging Face, and Hugging Face rebuilds the Space.
Everything begins locally. We assume you have built your machine learning model; it sits on your disk and it works. To make progress, you build and test your application locally using Docker. You could build it with Streamlit or Gradio or whatever framework you like.
For the whole setup to work, you need three files:
- a README in the specific format that Hugging Face expects,
- a Dockerfile, because we want to use Docker, and
- a GitHub Actions workflow file. GitHub Actions is the CI/CD product of GitHub, and a workflow is one of these automations.
Now, when you push your code into GitHub because you’ve committed a change, GitHub interacts with Hugging Face. The GitHub Action - the automation - pulls the Hugging Face repository. The one thing to keep in mind here is that every Hugging Face Space is literally just a Git repository under the hood. So the GitHub Action pulls that Git repository, updates the code for your application - your UI changes, model changes, or whatever it might be - and then pushes it back into Hugging Face.
Hugging Face now understands that the Space has been updated, so it has to rebuild. It looks at the Hugging Face-specific README file and the Dockerfile, and rebuilds the whole Space in maybe five minutes. With that, your updated application is live in a fully automated way.
Setting this up takes maybe half an hour to an hour. But everything from that point on is automated.
What you implement in your repository
So what do you actually have to implement in your repository to make this work?
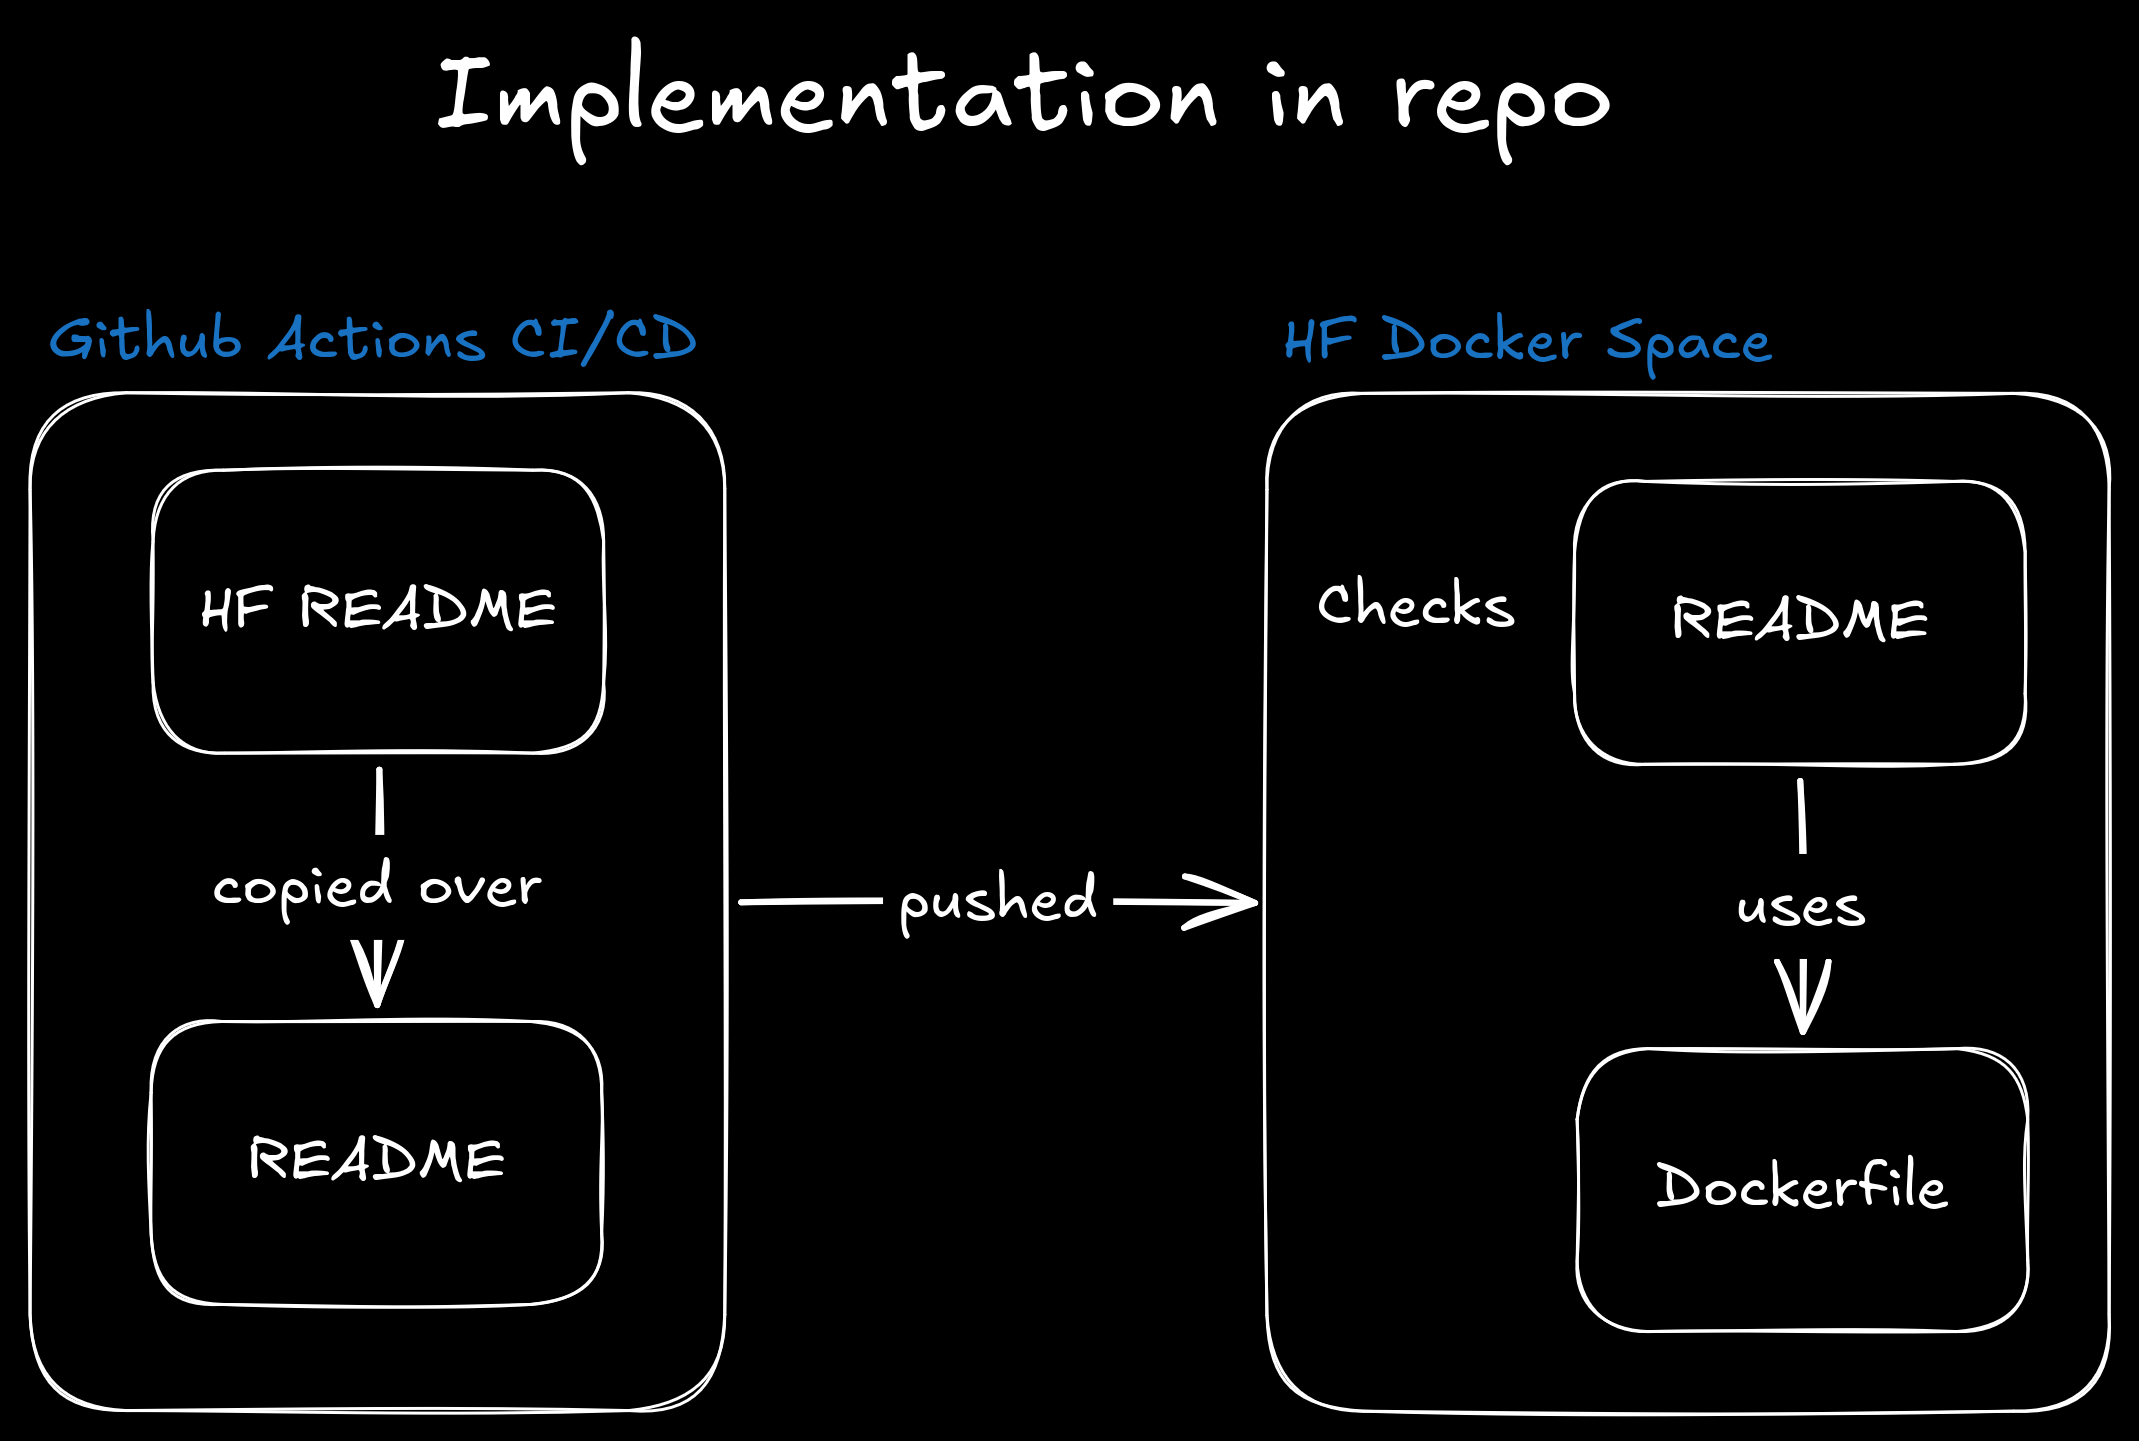
The GitHub Actions side copies the Hugging Face-specific README over the existing README and pushes everything across. The Hugging Face Docker Space then checks that README and uses the Dockerfile to rebuild.
The way I do it in my hobby project is that I take a Hugging Face-specific README and copy it over the existing README, because the README on Hugging Face is really what configures the whole deployment.
When GitHub then pushes everything back into Hugging Face, the Docker Space - to be precise - checks the README first and sees: ah, okay, this person wants to set up a Docker Space, they want to expose it on that port, and they want to call it that particular name. It then uses the Dockerfile to rebuild the image and deploys it.
The three files in detail
I mentioned the three required files: a Hugging Face-specific README, a Dockerfile, and a workflow file. Let’s go through them one by one.
The Hugging Face README
The README is a Markdown file - in my repo it’s called README_HF.md. There is no real content in it except for what’s called front matter - essentially metadata. Here you define the name of the Space, the emoji, the colors, the technology you want to use to deploy it, the app port you want to expose, and a short description:
---
title: Xournal++ HTR
emoji: ✍️
colorFrom: purple
colorTo: gray
sdk: docker
app_port: 7860
short_description: Online demo for Xournal++ HTR
---
Docker is selected here for its flexibility, because it also allows you to test the exact same setup locally.
The Dockerfile
The Dockerfile is a regular Dockerfile, here for Python. It installs a bunch of dependencies, copies the code in, installs the code inside the Docker image, and then runs the command that starts the web app:
# Start from an official lightweight Python image
FROM python:3.11-slim

# Install system dependencies
RUN apt-get update && apt-get install -y --no-install-recommends \
    git \
    wget \
    unzip \
    vim-tiny \
    curl \
    libgl1 \
    libglib2.0-0 \
    xournalpp \
    poppler-utils \
    && rm -rf /var/lib/apt/lists/*

# Install uv
RUN curl -LsSf https://astral.sh/uv/install.sh | sh
ENV PATH="/root/.local/bin:$PATH"

# Create and set working directory
WORKDIR /app

# Copy application code in
COPY . .

# Install the project inside the image
RUN bash INSTALL_HF_DOCKER_SPACE.sh

# Expose the port Gradio will run on inside Hugging Face Spaces
EXPOSE 7860
ENV PYTHONUNBUFFERED=1

# Command to run the Gradio app
CMD ["uv", "run", "python", "scripts/demo.py"]
I’m using a Gradio app here because it’s very easy and nice to deploy, and the Docker deployment gives me the full set of flexibility.
The GitHub Actions workflow
None of the above does anything if there is no workflow to trigger it and perform the steps that move everything over to the Hugging Face side.
This particular workflow has four steps. The first is to check out the code. The second installs Git LFS, which Hugging Face Spaces requires. Then comes the important part: it clones the code from Hugging Face into the CI/CD workspace, so it can copy the updated code into that repository, and then commits it back into Hugging Face. That last push is what actually updates the Space.
name: Deploy to Hugging Face Space

on:
  push:
    branches:
      - master  # Deploy whenever changes are pushed to the main branch

jobs:
  deploy:
    runs-on: ubuntu-latest

    steps:
      # Step 1: Check out the repository
      - name: Checkout repository
        uses: actions/checkout@v3

      # Step 2: Install Git LFS (required for Hugging Face Spaces)
      - name: Install Git LFS
        run: |
          sudo apt-get update
          sudo apt-get install -y git-lfs
          git lfs install

      # Step 3: Clone the Hugging Face Space
      - name: Clone Hugging Face Space
        run: |
          git clone https://user:${{ secrets.HF_TOKEN }}@huggingface.co/spaces/PellelNitram/xournalpp_htr hf-space

      # Step 4: Sync files from GitHub repo to Hugging Face Space
      - name: Sync files to Hugging Face Space
        run: |
          rsync -av --exclude='.git' --exclude='.github' --exclude='.env' --exclude='hf-space' ./ hf-space/
          cd hf-space
          git config --global user.email "<your_email>"
          git config --global user.name "Martin L (GitHub Actions)"
          mv README_HF.md README.md
          git add .
          if [ -n "$(git status --porcelain)" ]; then
            COMMIT_HASH=$(git -C ../ rev-parse --short=6 HEAD)
            git commit -m "Automated deployment from GitHub (source commit: $COMMIT_HASH)"
            git push
          else
            echo "No changes to commit"
          fi
        env:
          HF_TOKEN: ${{ secrets.HF_TOKEN }}
The HF_TOKEN is a Hugging Face access token with write permissions (create one here) that you store as a secret in your GitHub repository. Note the mv README_HF.md README.md line in the last step: that’s where the Hugging Face-specific README replaces the repo’s own README, exactly as in the diagram above. Replace PellelNitram/xournalpp_htr with your own Space.
The demo
Once this runs, let’s look at how the demo actually looks.
The demo lets users try the machine learning model under the hood without any installation. It’s really a convenience feature, and it also lets me collect data if people opt in. It’s a rich document too - you can add videos to explain what people are looking at, and then they can interact with the whole system.
The interesting bit lives in the Files tab of the Space, where you see a full replication of the code base from GitHub - but copied there completely automatically. Whenever the Hugging Face Space detects a change, it looks at the README (the Hugging Face-specific one), sees the configuration, and sets up the Space accordingly. In my case it’s a Docker Space, so the Dockerfile is used. After rebuilding, which takes maybe five minutes, the new version of the application is live.
Conclusion
With that, we’ve solved the problem of your model only living locally. You can now push it in an automated way to Hugging Face Spaces to share with your friends and peers - and future bosses :-).
Two more things for you:
- The example workflow file in my own repository - take it, steal it, and get inspired by it for your own project.
- If you’d like to support the work, consider starring Xournal++ HTR on GitHub, trying the live demo, or buying me a coffee on Ko-fi.
If you have any questions, please leave them in the comments of the video - I’m very happy to answer them. And if you have ideas for videos you’d like to see, also let me know: I’m eager to record a few more and share the message of how to bring machine learning features to the open source world.
Please hit me up on LinkedIn or email for any corrections or feedback.